Gateaux Basque is originated from a town in south of France. It is now famous at everywhere and different flavors of Gateaux was created by different chefs. I read this recipe from a french recipe book, the chef was using the traditional recipe by adding some cooked apple to make it more interesting. I noticed many people add blueberries, cherries or other fruits instead.
 It has a crumbly texture from the outside and soft texture from the inside which has contained with some cooked apple and custard. French named the custard as "Cream Patissier". European will love this cake as it's rich and buttery flavor. I would love it when I'm looking for something rich to fill my appetite and this is the one!

Recipe for one round tin 18cm x 3.5cm
For the Basque Pastry: 133g Butter / 133g plain flour / 67 ground almond / 2.6g Baking powder / 46g Egg yolks / pinch of salt / 100g sugar powder / 6g rum
For the Cream Patissier: 333g milk / 33g sugar / 1 teaspoon vanilla extract / 53g egg yolks / 33g sugar / 26g plain flour / 6g corn flour / 8g butter / some egg wash
Cooked apple : 2 large cooked apple / some sugar and butter / 1 teaspoon cinnamon
Method for the Cream Patissier:
- Warm the milk with sugar in a sauce pan.
- In another mixing bowl, mix the yolks with sugar then slowly add in plain flour and corn flour.
- When the sugar melted in the warm milk, add it to (2) the yolks mixture. Add little by little until everything combine.
- Pour it back to the pan at low heat. Keep stirring with the hand whisk until its thicken.
- Off the heat and keep stirring for couple of minutes, add in the vanilla extract then the butter.
- When everything combined. Pour it into a bowl and cover with cling film. Let it completely cool down and place it into the fridge for 4 hours or overnight and its ready to use.
Method for the cooked apple:
- Peel the apples and cut into 8 slices. You would have 16 slices.
- Grease a baking pan with butter then sprinkle with some sugar. Place the apples into the baking pan.
- Place some butter on top of the apples and bake at 180'C for about 1 hour. Sometimes it depends on what apples you are using. So keep an eye on it, the apple should have a little soft. Sprinkle with some cinnamon powder on the apple after 40 minutes baking.
Methods for the Gateaux:
- Mix the egg yolks with salt and rum together.
- In another bowl, beat the butter and sugar powder.
- Mix the egg yolks mixture (1) to the butter mixture (2). (Add little by little)
- Add in flour and mix until everything combine.
- Wrap it into a cling film and flatten it into 1cm thick. Place it into fridge to sit for 3 hours.
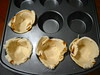
- After 3 hours, cut out 2 pieces of 18cm round shape and place one into the tin. (Do this with a cling film would be much easier)
- Continue to make about 3.5 cm long shape to fit the side of the cake tin. (If the mixture start to melt, place it back to the fridge until it could be easy to handle)
- Fill in the cream patissier then follow with some cooked apple. Cover with another piece of pastry on top. (You might not need all the cream patissier, I used 2/3 only)
- Egg wash the top and use a sharp knife to draw some pattern on it if you like. (I didn't draw it nicely so you couldn't get what I actually draw.)
- Bake in a 180'C preheat oven for 90 minutes or 2 hours. (place a piece of aluminium foil on top if you find it is burning too much on top after some times of baking, it is better to bake at the lower part of the oven)
- Let it completely cool down before cutting it into slices. It's best to serve the day after.

 Here is my second attempts on bagel. The recipe had a bit different from the previous bagel I've made. Not only its blueberry flavour but it's made by milk to produce a different texture.
 I made big bagel this time and used it for our main course sandwich. I blended some fresh blueberry into paste to produce a blueberry flavor bagel. It smell very blueberry and soft yet chewy. But I still have problem shaping it into a perfect round shape.
 I heard a guru said those commercial bagel was form by a round mould but for homemade we've got to use our fingers to make it. Anyway, I don't mind the rustic one but still trying the best to make as round as I can.
Recipe makes four big bagels:
Bread flour 250g
Caster sugar 20g
Salt 1/4 teaspoon
Yeast 3g
Milk 95g
Blueberry paste 50g
Unsalted butter 5g
Method:
I heard a guru said those commercial bagel was form by a round mould but for homemade we've got to use our fingers to make it. Anyway, I don't mind the rustic one but still trying the best to make as round as I can.
Recipe makes four big bagels:
Bread flour 250g
Caster sugar 20g
Salt 1/4 teaspoon
Yeast 3g
Milk 95g
Blueberry paste 50g
Unsalted butter 5g
Method:
 I've been using this
  I like this recipe because it don't need to be stirred all the time so that I can continue with other stuffs while cooking it. With the double boiling cooking method I always got a very smooth kaya. I reduced some sugar from the original recipe as I found it's too sweet for me. But it's very depends on you.


 This suppose to be a large burger but I intentionally make it into small portions to match with the little homemade buns I've made.
Ingredients for the burger: (Makes Approx. 8 Burgers)
(book reference: Jamie's Dinner)
1kg minced pork (I used lean minced pork)
1 onion, peeled and finely chopped
Olive oil
A pinch of cumin seeds (powdered)
1 tablespoon coriander seeds (powdered)
sea salt and ground black pepper
a handful of freshly grated parmesan cheese
1 tablespoon english mustard (I used D-jon mustard)
1 large egg
115g breadcrumbs (I used fresh bread and pulse in a food processor)
For the Buns: (makes 10 buns)
300g bread flour
7g yeast
9g sugar
6g salt
4g milk powder
190g (1 egg + water)
20g butter
Method for the burger:
This suppose to be a large burger but I intentionally make it into small portions to match with the little homemade buns I've made.
Ingredients for the burger: (Makes Approx. 8 Burgers)
(book reference: Jamie's Dinner)
1kg minced pork (I used lean minced pork)
1 onion, peeled and finely chopped
Olive oil
A pinch of cumin seeds (powdered)
1 tablespoon coriander seeds (powdered)
sea salt and ground black pepper
a handful of freshly grated parmesan cheese
1 tablespoon english mustard (I used D-jon mustard)
1 large egg
115g breadcrumbs (I used fresh bread and pulse in a food processor)
For the Buns: (makes 10 buns)
300g bread flour
7g yeast
9g sugar
6g salt
4g milk powder
190g (1 egg + water)
20g butter
Method for the burger:
 I remember the first
  By the way, did you realize that there were actually five bagels in the above image?
 These aren’t the giant-sized bagels as I purposely make it for breakfast or a snack.


 Now, the plum tart become a protagonist.
 I think any fresh fruits would be delicious with the combination of frangipane and rich shortcrust pastry. I love the color of plums, its sharpness of color had pampered my appetite.
 The bread was made as usual, proof for one hour then punch out the gas and portion it to rest for 15 minutes. Then cover with the polo pastry and proof for another one hour and just wait for the 15 minutes of baking you could have a yummy polo bun. It's really smell good while I was waiting for it to come out from the oven. I like its cottony soft texture, and the crumbly polo pastry outside the bread. It's so tasty!
 PS: It's yummy to eat plain as it is. I tried insert a piece of cheese and bake in the oven for the next day and it's wondeful. My other half likes to eat it with kaya. Whatever it is...it's delicious!
Recipe makes 4 buns:
For the bread: 150g bread flour / 1 tbsp milk powder / 1/4 tsp salt / 30g sugar / 1 tbsp beaten egg / 1 tsp yeast / 70g water / 15g butter
For the polo pastry: 50g plain flour / 25g sugar powder / pinch of salt / 1 tbsp beaten egg / 30g butter
PS: It's yummy to eat plain as it is. I tried insert a piece of cheese and bake in the oven for the next day and it's wondeful. My other half likes to eat it with kaya. Whatever it is...it's delicious!
Recipe makes 4 buns:
For the bread: 150g bread flour / 1 tbsp milk powder / 1/4 tsp salt / 30g sugar / 1 tbsp beaten egg / 1 tsp yeast / 70g water / 15g butter
For the polo pastry: 50g plain flour / 25g sugar powder / pinch of salt / 1 tbsp beaten egg / 30g butter


 Chocolate moist cake was one of the most frequent buying product from the "King of the Belgians Restaurant". I suppose its enchantment for those chocoholics is heaven!
I would normally leave the cake plain without any decoration but this time of year I must add something in order to look like a celebration cake for my friends birthday. I don't have any piping skills so I gave it a floral arrangements to produce a better look. However, the flowers is unedible, it's just for decoration.
The texture was very moist with rich chocolate flavor. Perhaps the instant coffee had enriched the cake flavor and it wasn't too sweet for the birthday girls.
Chocolate moist cake was one of the most frequent buying product from the "King of the Belgians Restaurant". I suppose its enchantment for those chocoholics is heaven!
I would normally leave the cake plain without any decoration but this time of year I must add something in order to look like a celebration cake for my friends birthday. I don't have any piping skills so I gave it a floral arrangements to produce a better look. However, the flowers is unedible, it's just for decoration.
The texture was very moist with rich chocolate flavor. Perhaps the instant coffee had enriched the cake flavor and it wasn't too sweet for the birthday girls.


 I had some left over cream in the fridge so I decided to minimize all the ingredients from the original recipe that just enough to make two cups.
I felt the panna cotta was too lonely standing alone so I simply process few oreo biscuits in the food processor, until the mixture has the consistency of fine breadcrumbs then placed it beside the coffee panna cotta.
I had some left over cream in the fridge so I decided to minimize all the ingredients from the original recipe that just enough to make two cups.
I felt the panna cotta was too lonely standing alone so I simply process few oreo biscuits in the food processor, until the mixture has the consistency of fine breadcrumbs then placed it beside the coffee panna cotta.
 The oreo biscuit crumbs are just so match with the puddings especially the smooth and wobbling consistency, really attractive! I think this dessert is simple and nice for serving guests as it could be made in advance and keep in the fridge until the dessert time.


.jpg)