Kitchen Corner

February 27, 2009

Custard Bun

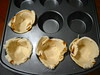
My first attempt on this custard buns which suppose to be a loaf of bread but I make it into nine little buns and pipe some custard for the extra flavour. There are super soft buns and I believe if I make it into a loaf of bread it would be definitely fantastic texture to eat in slices. I make the buns in the late evening which totally no natural lightning for the shooting. Somehow, just right after the shooting, my other half hardly resist the smell and the sweetness and require to have one before sleep. I'll definitely make this bread again.
Recipe:
(A) Custard: 2 egg yolks / 20g sugar / 30g bread flour / 130g milk
(B) 250g bread flour / 30g sugar / 1/2 tsp salt / 1 tsp yeast / 15g milk powder / 100g water
(C) 25g unsalted butter
How I made it:
  1. For the custard, boil the milk with sugar until sugar dissolve but not boiling. Meanwhile, mix the egg yolks and bread flour to become a thick paste but no lumps. Add two tablespoon of milk if you find it too dry to mix.
  2. Pour the dissolve warm sugar milk into the egg yolks mixture, pour little by little and mix with a hand whisk until everything combine. Then, pour back the mixture into the cooking pan. Cook in very low heat and keep stirring until it thicken. Transfer to a plate and cover with cling wrap and chill for 60 minutes.
  3. Mix ingredients (B) and half of the custard until it become a smooth dough. Add in butter and continue to knead until it become a smooth and elastic dough.
  4. Place the dough into a clean bowl and cover with cling wrap to proof for 80 minutes.
  5. Divide the dough into 9 portions. Let the dough rest for 15 minutes.
  6. Roll each dough into ball shape and proof for 60 minutes.
  7. Egg wash the doughs then pipe some custard on the doughs. Bake at 190'C preheated oven for 25 minutes until golden brown.

February 24, 2009

Blueberry Baked Cheesecake

I've some leftover blueberries so I used to make a very simple cheesecake. I would normally bake cheesecake by using the water bath method, but after came across a recipe from a book which is bake right straight in the oven without water bath, I decided to give it a try.
There were some different between water bath method and bake straight in the oven. Water bath method normally gives a moisture and creamier texture whereas I found this bake straight in the oven is much firmer and dense. I still prefer those water bath bake cheesecake but this blueberry cheesecake quite refreshing.
Recipe:
Digestive biscuit crumbs 90g
Melted butter 40g
Cream cheese 300g
Yogurt 15g
Sugar 50g (I used 30g)
Eggs 3 (lightly beaten)
Lemon juice 10ml
Corn flour 10g
Some blueberries
  1. Mix the bread crumbs with melted butter and press it into a 9 inches cake tin evenly. Set aside.
  2. Beat the cream cheese with sugar until the sugar dissolve. Mix in the yogurt until everything combine and smooth.
  3. Slowly add in the beaten eggs then lemon juice.
  4. Mix in the cornflour until everything incorporate.
  5. Pour the cream cheese mixture into the cake tin and topped with some blueberries. Bake in a 150'C preheated over for 25 minutes.
  6. Keep the cheesecake in the fridge once it completely cool down.

February 20, 2009

Blueberry Crumble Muffins

Perhaps it's the blueberry season in New Zealand as I found lots of New Zealand Blueberries on sale at the market recently. I bought few packets and here I've made some muffins with those little blueberries. I just realized that blueberries are a rich source of vitamin C as well as powerful antioxidant phytochemicals (plant chemicals), which help protect the body from illness. I would normally eat the blueberries straight or make it as fruits salad with yogurt. But this time I'd like to add it into my cakes.
I reduced some sugar for this recipe as I want to bite the natural sweet from the blueberries. I baked ten muffins and kept half in the freezer so that I could have it anytime I want. What I did is cling wrap the muffins after it completely cool down and kept in an airtight container then tuck it into the freezer while it's still fresh. For breakfast, I took it out from the freezer and just tuck it into 120'C oven for about 15 minutes. By the time I finish my washing and ready a cup of coffee, I've got a fresh and yummy blueberry crumble muffins. The muffins stayed soft and fluffy with the crumble topping that had given it extra texture and flavor. Without that much of sweetness from the muffins I could really taste the natural sweet from the blueberries.
Recipe for 10 muffins:
100g butter
90g sugar
2 eggs
200g plain flour
1 tsp baking powder
a pinch of salt
120ml milk
some blueberries (6 blueberries for each muffins)
For the crumble:
25g ground almonds
70g plain flour
40g polenta (not quick-cook)
70 butter (cold)
20 Light muscovado sugar
splash of water
How I made it:
  1. Beat the butter with sugar until light and fluffy and the sugar completely dissolve. Add eggs one at a time until well combine then add pinch of salt.
  2. Mix half the shifted flour and baking powder into the batter and then mix in half the milk.
  3. Fold in the rest of the flour with the milk by a spatula until everything just combine.
  4. For the crumble topping, place the almonds, flour, polenta, butter and sugar in a food processor and pulse briefly several times, just to mix. The mixture should look like coarse breadcrumbs.
  5. Tip out into a bowl and add a splash of water. Use a spoon to mix briefly - it should be quite clumpy.
  6. Fill half the muffin cups with the batter then add three blueberries. Fill some batter again then top with another three blueberries. Sprinkle the crumble mixture over the each muffins and bake at 170'C preheated oven for 30 minutes.

February 16, 2009

Strawberry Chocolate Cake

For some reason I've got to bake this cake. Simple yet suit for everyone appetite. A combination of chocolate sponge, strawberries, fresh cream and chocolate fudge turn it into an ordinary celebration cake.
Recipe:
For the sponge: 4 whole large eggs/100g sugar/1g salt/80g plain flour/2g baking soda/12ml oil/40ml milk 16g cocoa powder

For the filling: 120ml fresh cream/strawberries (cut in half)

For the chocolate fudge: 50g cocoa powder/125ml water/200ml evaporated milk/100g sugar/1/2 tsp salt/1 tsp vanilla extract/2 egg yolks/60g cornflour/60g butter

How I made it:

  1. Mix cocoa powder, milk and oil until a thick paste, set aside.
  2. Whip the eggs and gradually add in sugar. Whip until very light yellow and fluffy.
  3. Fold in shifted plain flour and baking soda. Do this gently.
  4. Fold in cocoa paste (1) until well combine. Pour into two round 8 inches baking tin. Bake at 200'C preheated oven for 15 minutes.
  5. For the filling, whip the fresh cream with some icing sugar if desire. Spread some whipped cream on a sponge and place with some strawberries. Spread the left over whipped cream on the strawberries then sandwich with another layer of sponge.
  6. For the chocolate fudge, mix all the fudge ingredients except butter cook in a double boiler and keep on stirring with a hand whisk until the mixture thickens. Lastly add in the butter until a smooth consistency. Gently spread the fudge on top and side of the cake. Chill in the refrigerator for 2 hours then top with some strawberries.

February 6, 2009

Red Bean Buns

I simply couldn't resist to bake something while I was away from home recently. My hand was so itchy that just couldn't stop touching those utensil in the kitchen of my mother-in-law. She had ready made red bean paste so we decided to make some red bean buns together using her new bread machine. I felt so good after the baking as the bread turn out quite pretty, soft and tasty.

Bun recipe:

(A) 200g bread flour / 20g plain flour / 25g sugar / 1/4 teaspoon salt / 1/2 tsp + 1/4 tsp yeast / 15g milk powder / 25g eggs / 115g water / 15g butter

(B) 200g red bean paste (divide into 8 portions) / 20g white sesame

How we do it:

  1. Mix ingredients (A) with bread machine for 30 minutes until it become a smooth and elastic dough.
  2. Place the dough into a clean bowl and cover with cling wrap to proof for 60 minutes.
  3. Divide the dough into 8 portions and round them into small balls. Then fill the doughs with red bean and shape it into a smooth balls. Let the dough proof for 15 minutes.
  4. Slightly flatten each dough and use a scissor to cut the edges into 8 flower pedals. Continue to proof for 10 minutes.
  5. Egg wash the doughs then top with some sesame. Bake at 190'C preheated oven for 15 minutes until golden brown.

February 2, 2009

Chocolate Walnut Brownie

I've got two favorites brownie recipes that I've baked for years. This chocolate brownie I would like to introduce here was made by 100% cocoa powder whereas another brownie recipe will made by 70% dark chocolate which I'll introduce another time. Both are delicious! The secret of making brownie is, never over cook it. You don't want a skewer insert and come out clean and that makes perfect brownie. I found pecan and walnut gave better texture for the brownie or you could add dried cherry to give a bit of sweet and sourly or topped with almond flakes etc.
I afraid this brownie would be slightly bitter for children as the cocoa really strong as I've added some coffee in it but you could just ignore the coffee if you made for children. As for adult, the coffee added really gave the brownie a wonderful aroma. You will like it!
Recipe: 115g unsalted butter, softened, plus extra for greasing
120g caster sugar
2 eggs
40g plain chocolate (minimum 70% cocoa solids)
55g pecans or walnut
1 tsp vanilla extract
2 tsp instant coffee granules
2 tbsp warm water
1 tsp baking powder
55g plain flour
55g cocoa powder Method
  1. Preheat the oven to 180C. Prepare the cake tin. Grease an 18cm/7in square cake tin and line with non-stick baking parchment.
  2. In a clean bowl, cream together the butter and sugar until pale and fluffy. Beat in the eggs, one at a time.
  3. Chop the chocolate and put to one side. Chop the pecans, if using. Gently fold the nuts and chocolate into the butter and egg mixture. Add the vanilla extract.
  4. Dissolve the coffee granules in two tablespoons of warm water and add to the mixture. Mix together well.
  5. Add the baking powder, then sift in the flour and cocoa powder. Mix well; the mixture will be quite wet.
  6. Spoon the brownie batter into the prepared tin and level out the top with a spatula.
  7. Bake in the oven for 30 minutes. Don't over bake, you may have a skewer insert into the cake and come out not clean.
  8. Allow to cool in the tin for ten minutes, then place on a wire rack to cool.